Use this tool for checking and adjusting optical plummet tribrachs & tribrach bubbles.
The adjuster is constructed of precision-machined anodized aluminum with a 2-minute bubble.
Weighs 1.3 lb (0.59 kg)
Using the SECO Tribrach Adjusters - Tech Tip Number: 12
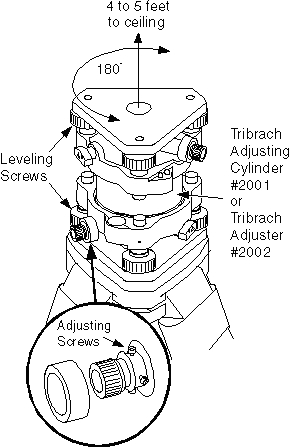
Optical Plummet Adjustment Using: Tribrach Adjusting Cylinder #2001 or Tribrach Adjuster #2002 (see illustration 1)
EQUIPMENT NEEDED: Tribrach Adjusting Cylinder #2001 or Tribrach Adjuster #2002, Tripod or instrument stand, 2 tribrachs, target
1. Place the tribrach on the tripod. Put the adjuster in the tribrach. Place the tribrach to be adjusted on top of the adjuster so that it is upsidedown looking at the target on the ceiling. The distance between the tribrach and target should be between 4 and 5 feet.
2. Using the leveling screws of the bottom tribrach, point the crosshair of the tribrach being tested to coincide with the target.
3. Rotate the tribrach being tested 180 degrees on the adjuster. Crosshairs will stay on the target of an adjusted tribrach.
4. After 180 degree turn if the crosshair does not stay on the target, half the error should be corrected with the adjusting screws provided by the manufacturer of the tribrach. The remainder should be corrected with the leveling screws of the bottom tribrach.
5. Repeat steps 2, 3 & 4 until the crosshair stays on target at all positions.
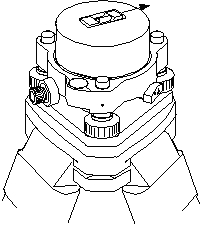
EQUIPMENT NEEDED: Tripod or instrument stand, Tribrach Adjuster #2002 and adjusting pins.
1. Place the tribrach on the tripod and fasten to the tripod.
2. Place the #2002 in the tribrach and level the tribrach using the vial on the #2002. Ignore the circular vial on the tribrach.
3. To level the #2002: Point one end of the #2002 vial to any leveling screw and using that screw bring the vial to center.
4. Now turn the #2002 90 degrees so that each end of the vial is as close as possible to the other two leveling screws. Using these two leveling screws, center the vial.
5. Turn the vial 90 degrees back to the original leveling screw and level again if necessary.
6. Repeat 1,2 & 3 until the vial remains centered at both positions.
7. To test the adjustment of the #2002 vial at any centered position, rotate the #2002 180 degrees. The vial should stay centered within one graduation. If not, take half the error back to the center with the vial mounting screw that is on the high side. 8. If the circular vial on the tribrach is not centered, use the adjusting screws and bring to center.
Illustration 1 illustration 2
WARNING - This product contains chemicals known to the state of California to cause cancer, birth defects or other reproductive harm. For more information go to www.p65warnings.ca.gov.